Guide/SendApp Agent/Channels
Connect WhatsApp to SendApp Agent with the official Cloud API
WhatsApp is SendApp Agent's main channel and connects through Meta's official API: the official environment, with approved templates, the verification badge for your business and maximum number protection. Here's how to connect it step by step.
Updated on June 16, 2026 · 6 min read
Before you start
- An active SendApp Agent account
- A phone number dedicated to WhatsApp Business
- A Meta Business account
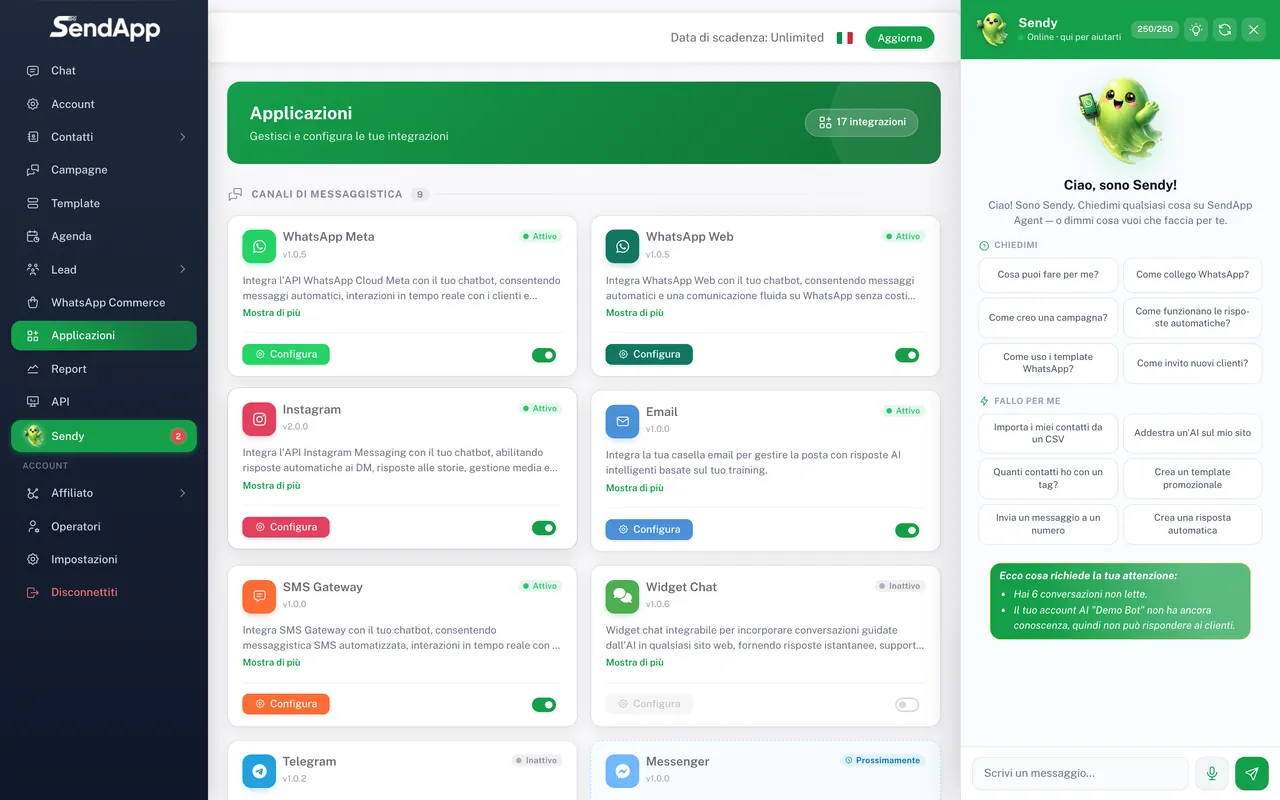
Connect WhatsApp through Meta's official API
The connection uses Meta Embedded Signup, the official Cloud API procedure: it's not a QR code and you never copy or paste any token. You start from SendApp, then Meta's official popup guides you all the way to an active number. Here are all the steps, with the real screens.
Coexistence: you can also connect a number you already use with the WhatsApp Business app. In coexistence mode the number works on both the app and the API, without starting over (see below). In that case, at step 6 choose to connect the existing app instead of a new number.
- 1
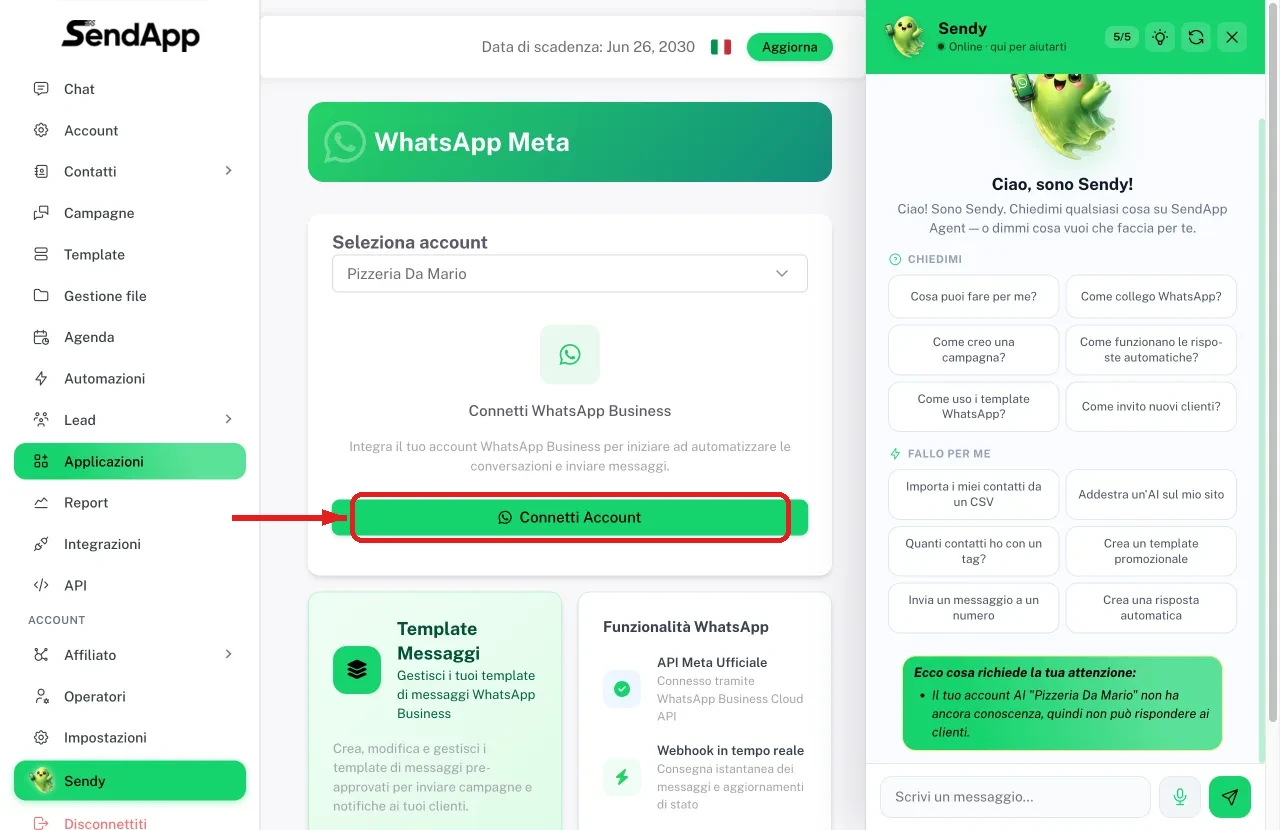
Start the connection from SendApp
In SendApp go to Applications → WhatsApp Meta, select the Account (the AI bot) to connect the number to and click “Connect Account”.
- 2
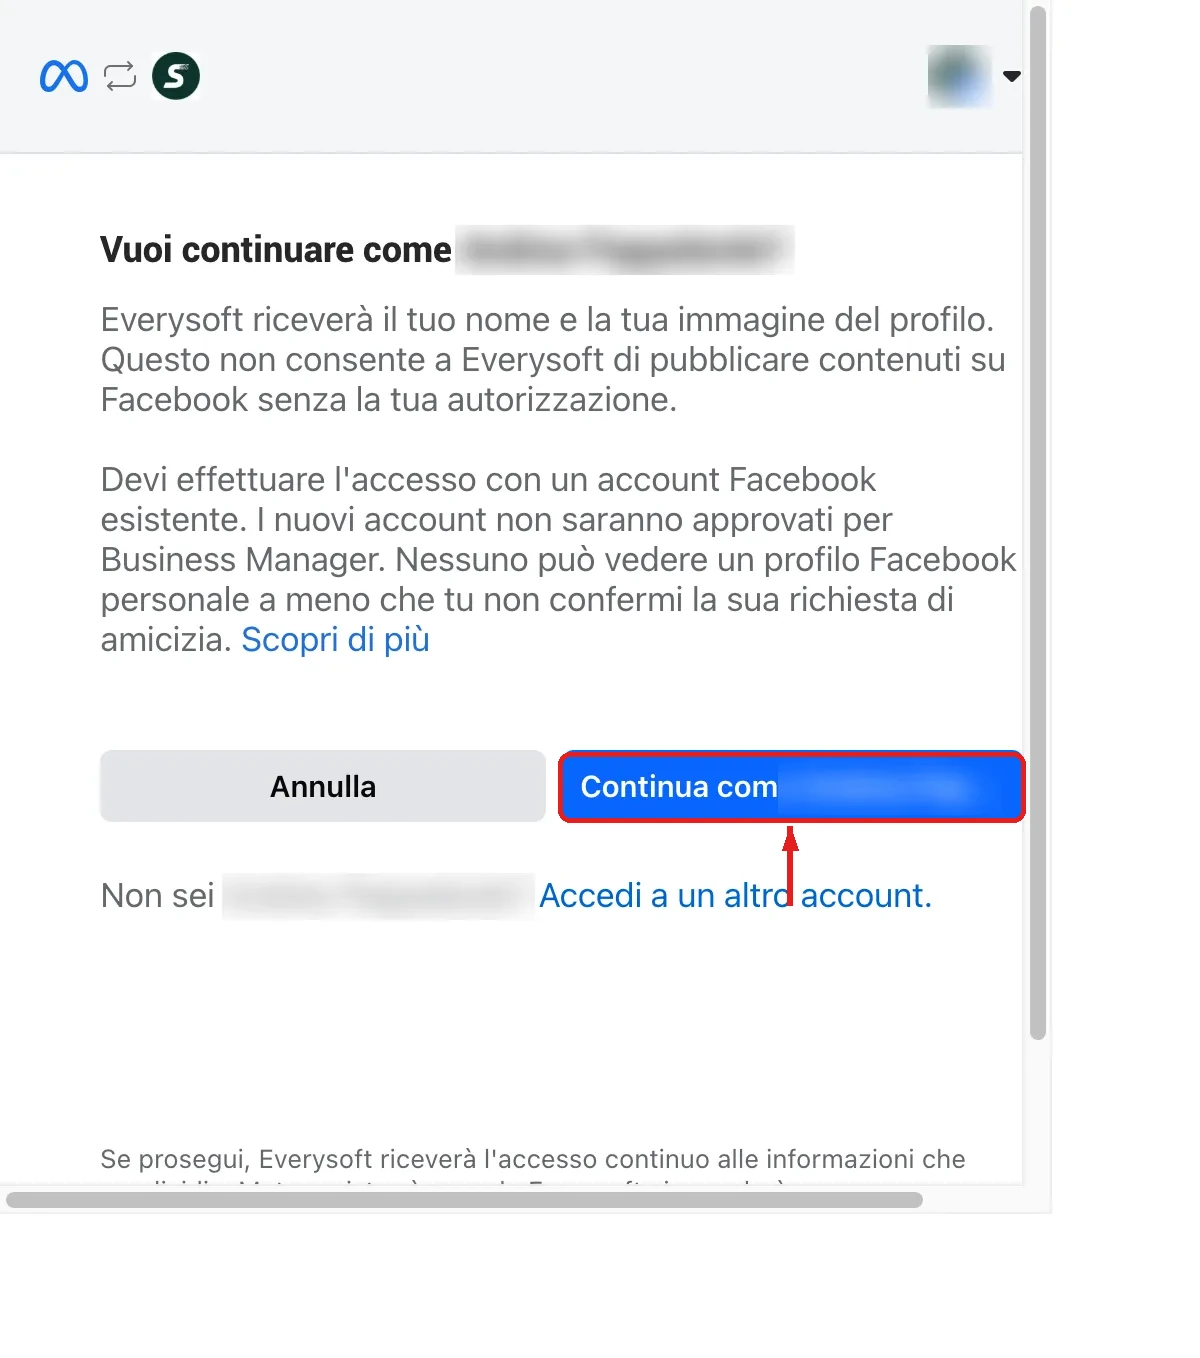
Confirm your Meta profile
Meta's official popup opens: check it's your profile and click “Continue as…”.
- 3
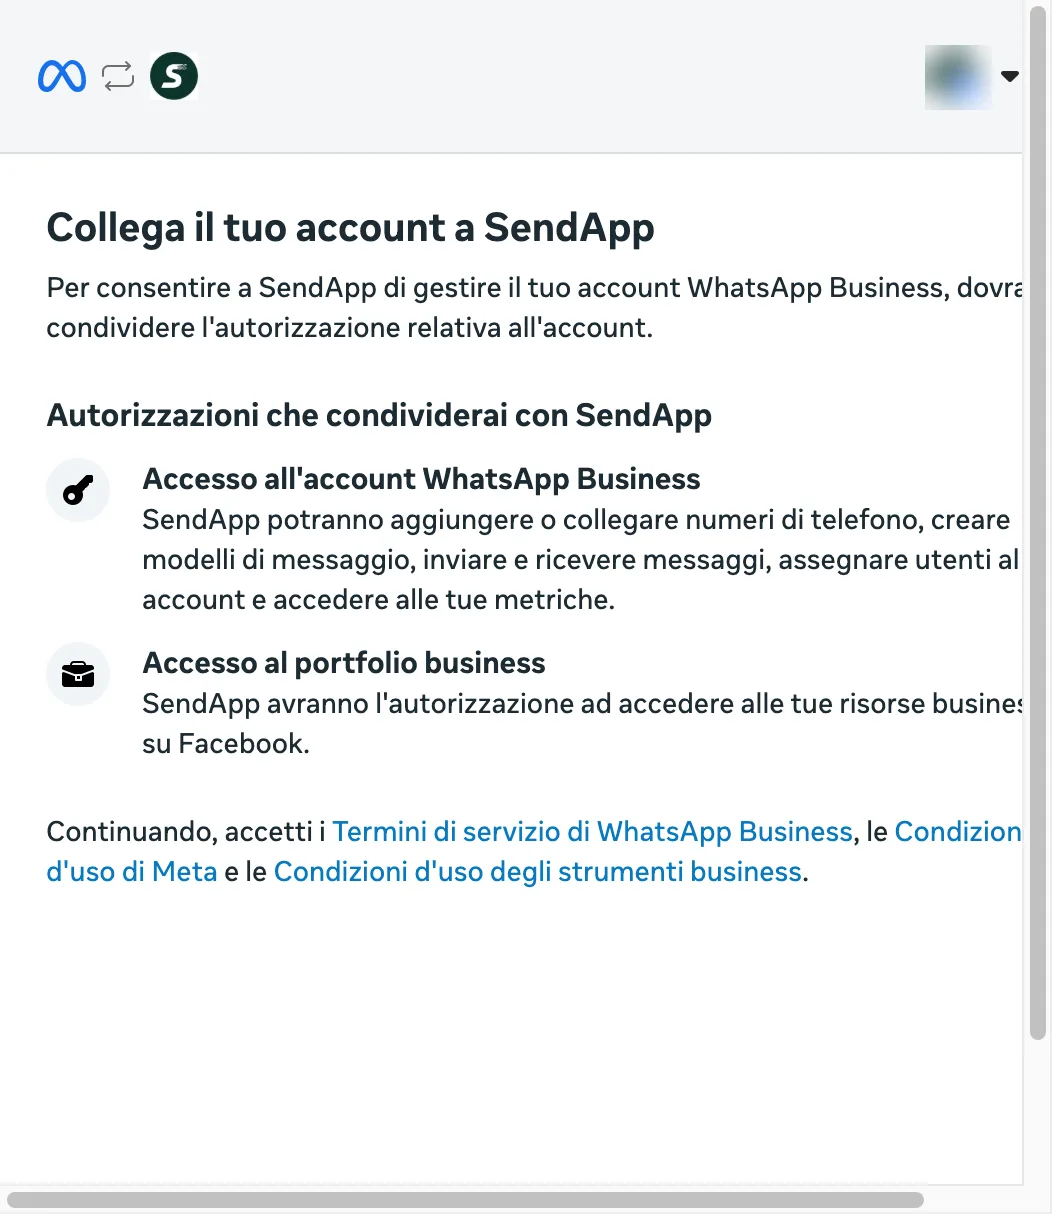
Grant the permissions
Meta shows the permissions you will share with SendApp to manage WhatsApp: click “Continue”.
- 4
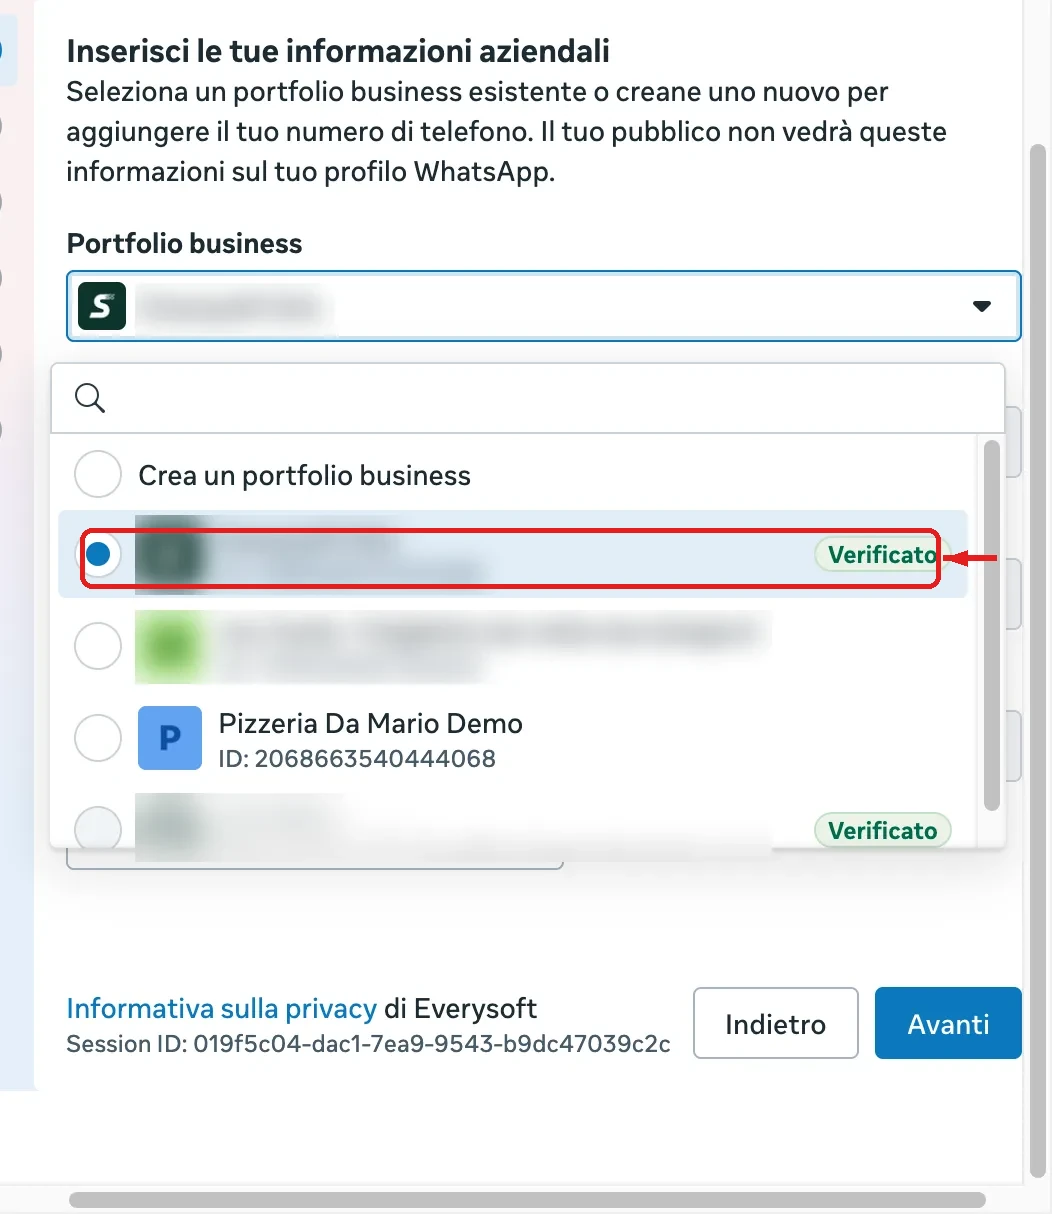
Select the business portfolio
Choose your business portfolio from the list. Don't have one? See below, in the “No business portfolio?” section.
- 5
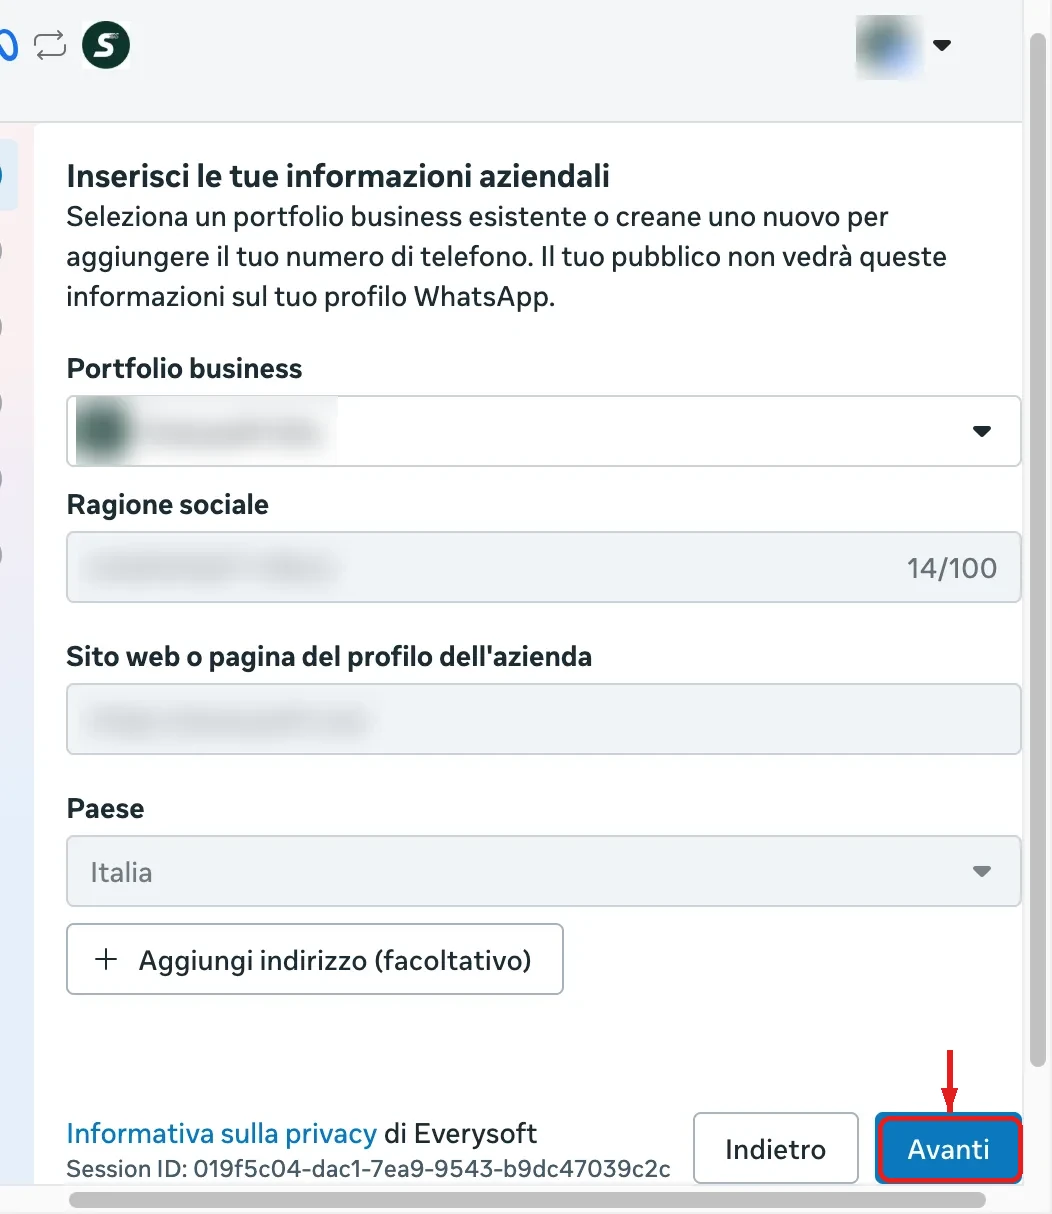
Confirm the portfolio details
Company name and website fill in automatically based on the chosen portfolio: check them and click “Next”.
- 6
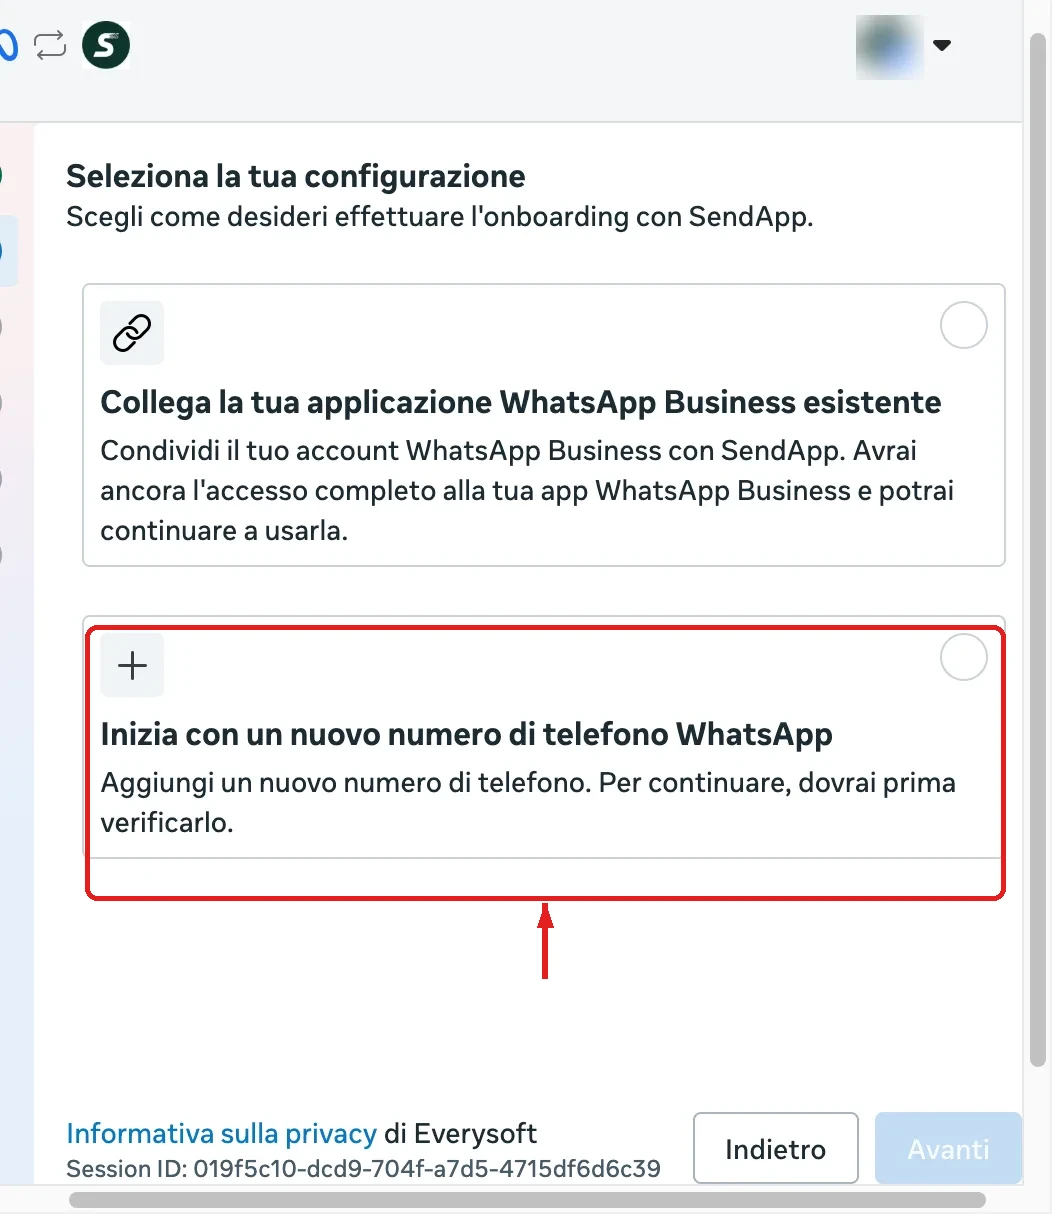
Choose how to connect the number
Choose “Start with a new WhatsApp phone number”. Alternatively, for coexistence, connect here the number you already use in the WhatsApp Business app.
- 7
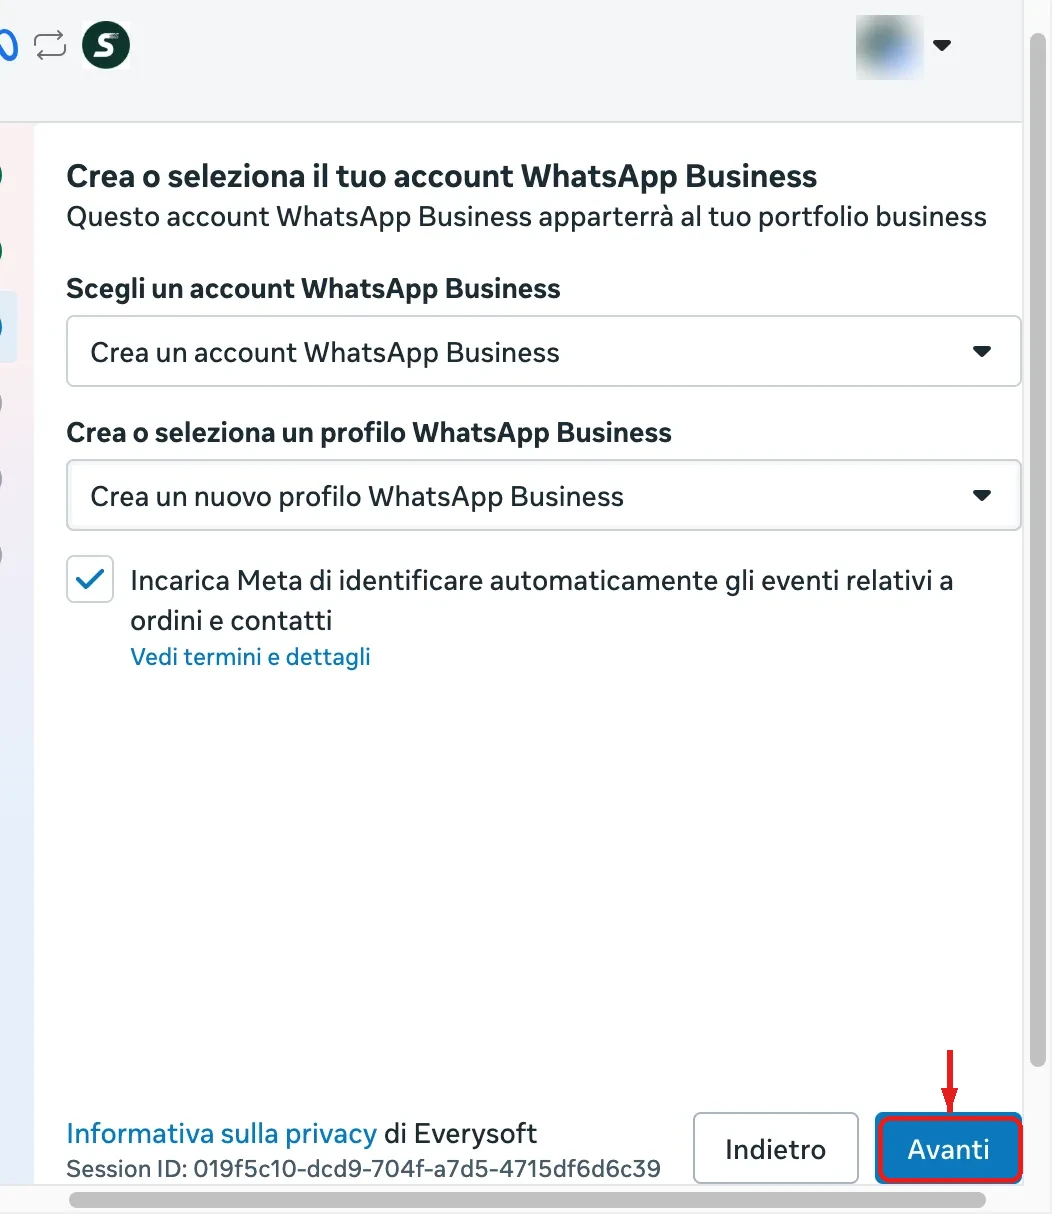
Create the WhatsApp Business account
Leave “Create a WhatsApp Business account” and “Create a new profile” selected, then click “Next”.
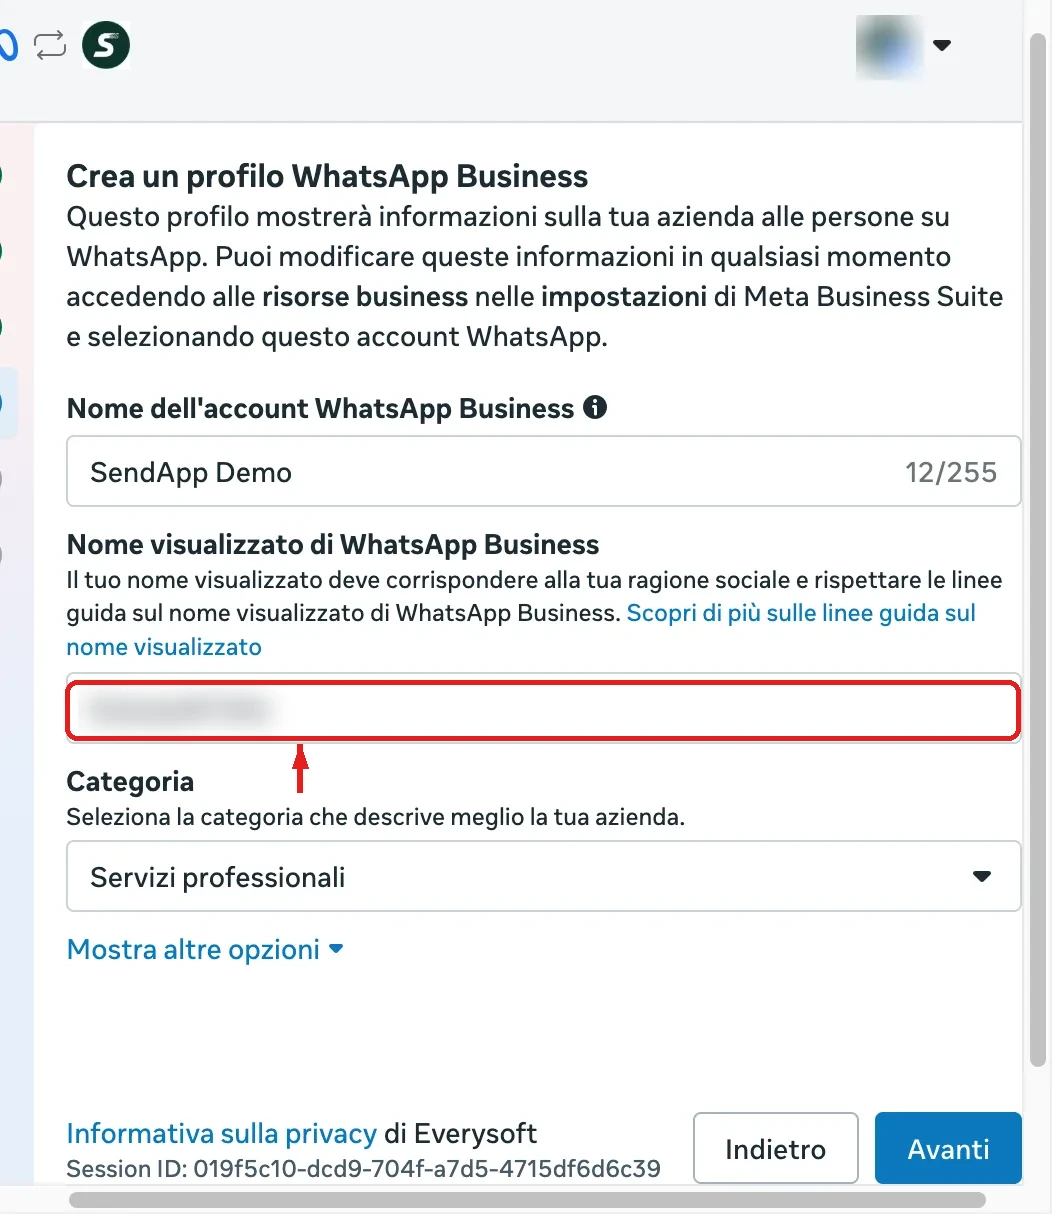
- 8
Set up the business profile
Give the account a name, set the display name (it must match the company name) and choose the business category.
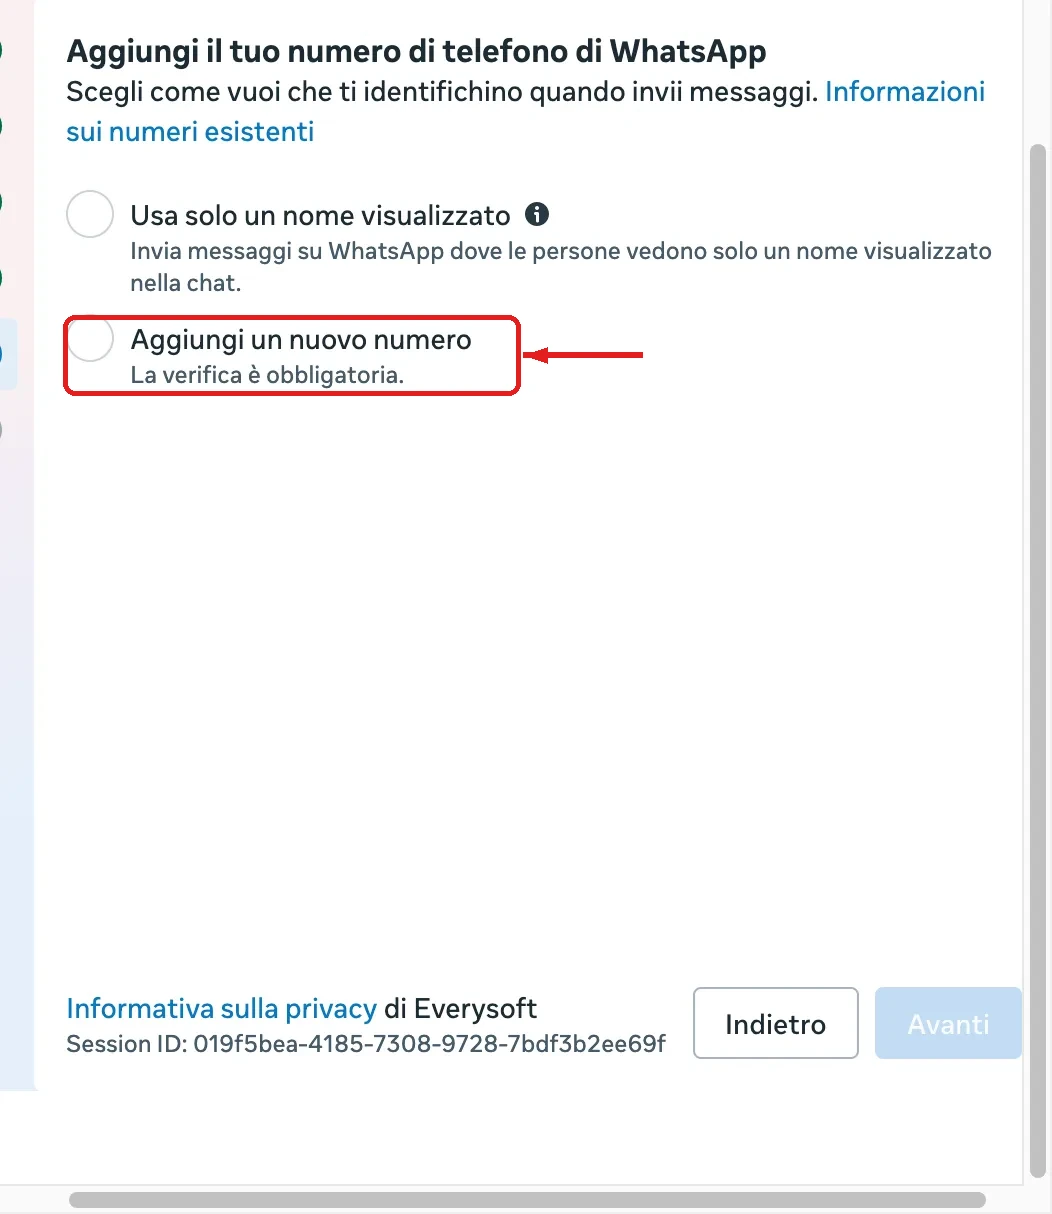
- 9
Add the phone number
Choose “Add a new number”: number verification is mandatory.
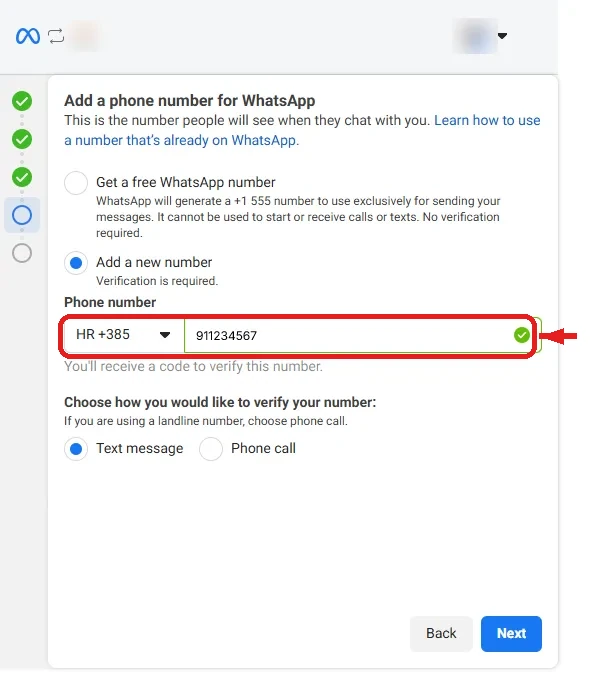
- 10
Receive the verification code
Enter the number with its country code (+1, +44, …) and choose “SMS” (or call, if it is a landline).
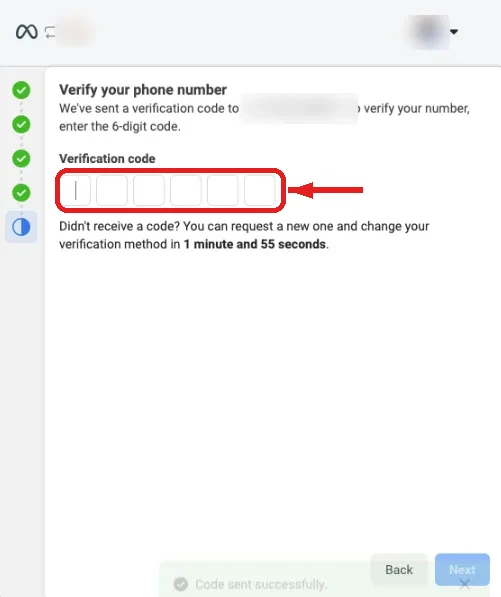
- 11
Enter the 6-digit code
Type the code received by SMS to confirm the number.
- 12
Connection complete
Done! Click “Finish”: you return to SendApp with the number active and conversations start arriving in Chat, where the AI can reply.
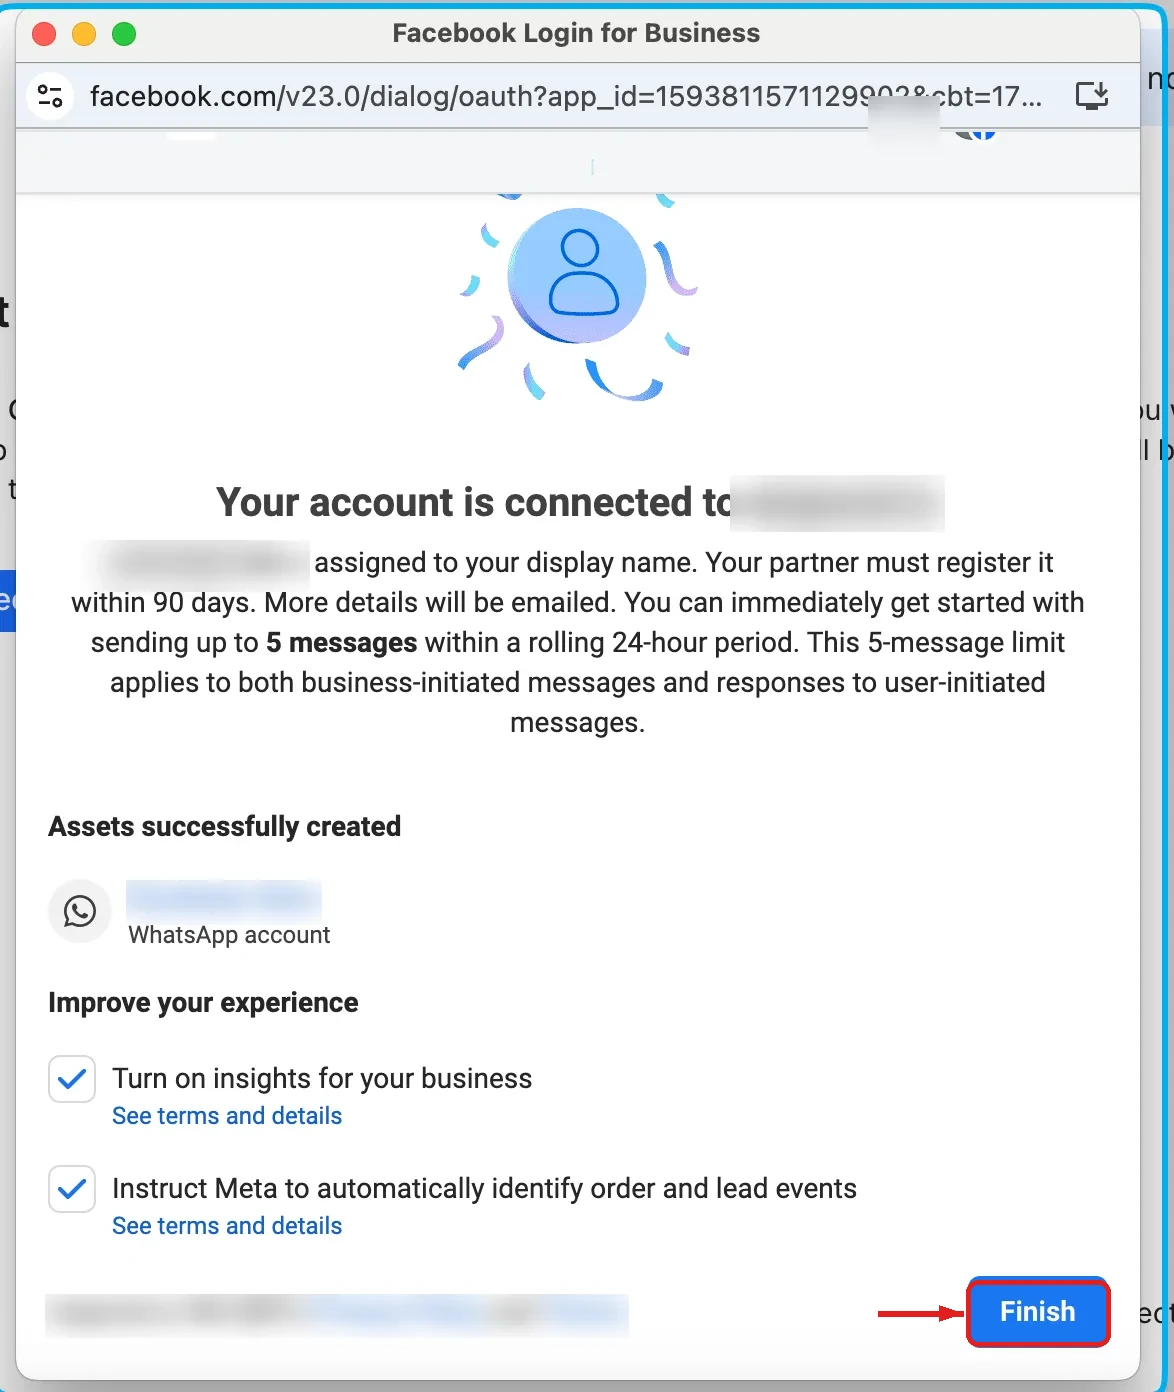
Some popup screens may appear in English: the interface follows the language of your Meta account, but the steps are identical to those described here. The official screens (always up to date) are documented by Meta in the official Embedded Signup flow.
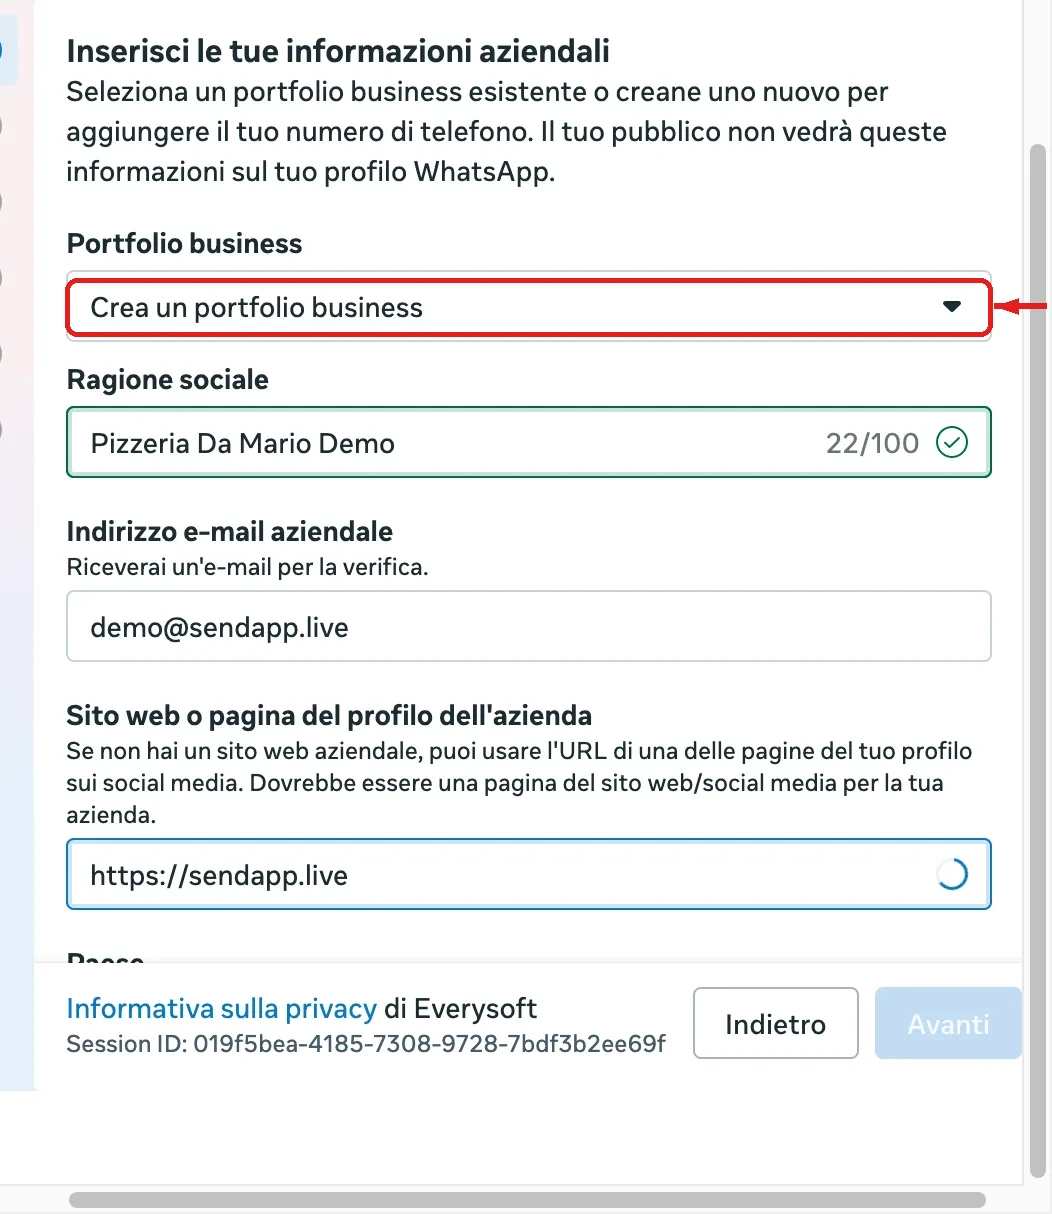
No business portfolio? You can create one on the spot
If no portfolio appears in the list at step 4, choose “Create a business portfolio” in the menu: all you need is a company name, business email and website. You can also create it beforehand from Meta Business Manager.
One number per Account: connecting a second number to the same Account overwrites the first. To manage multiple WhatsApp numbers, create a separate Account for each one (see the “Operators and permissions” guide and the FAQ below).
Business verification (optional)
Business verification on Meta isn't required to get started, but it's needed to raise your limits (beyond the ~250 new conversations per day of the initial tier) and to obtain the verification badge. It's done in Meta Business Manager, not in SendApp.
- 1
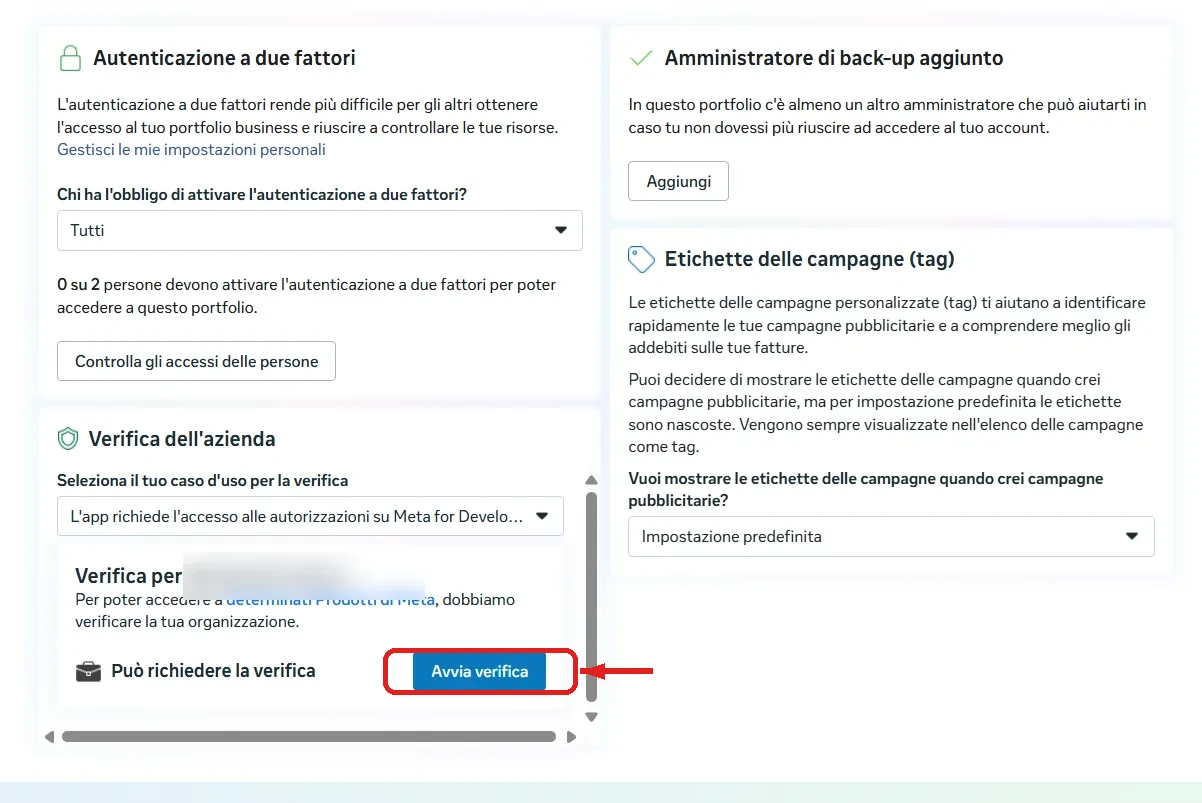
Start verification from the Security Center
In Business Manager → Settings → Security Center you will find “Business verification”: click “Start verification”.
- 2
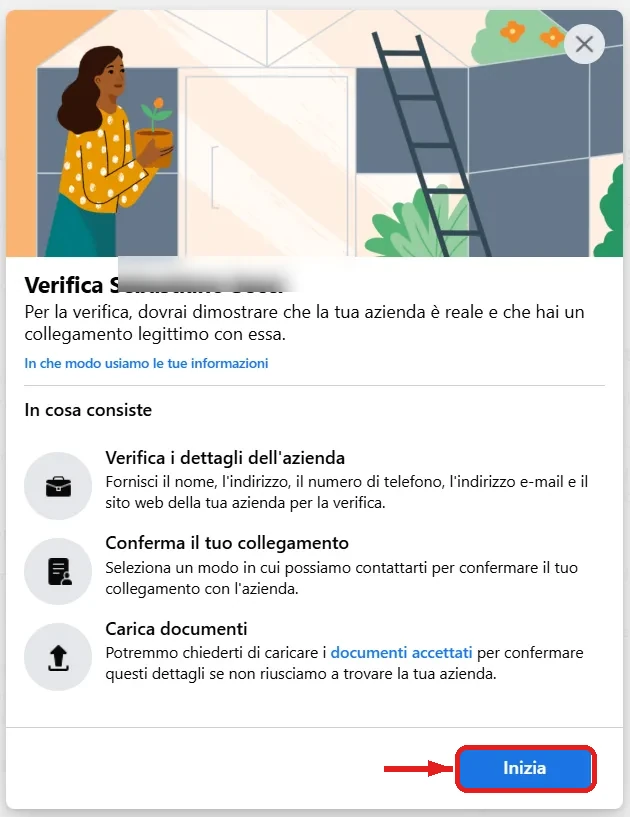
Fill in the form and upload a document
Meta asks for your business details and a document (business registration, VAT certificate or a utility bill): click “Start” and follow the procedure.
The verification badge (since 2024 it's blue, no longer green: Meta unified verification with Facebook and Instagram) and business verification are requested and managed on Meta, not in SendApp, and depend on Meta's approval. See the official page on verified business accounts.
Coexistence: using the number on the app and the API together
With coexistence you connect to the API a number you already use in the WhatsApp Business app and keep using it on both: the app stays active and, at the same time, incoming messages are also handled by SendApp, where the AI can reply. It is the most convenient way to move to the official API without starting over.
- What you need
- WhatsApp Business app updated to a recent version, the number added to Meta Business Manager, and the app opened at least once every 14 days to keep the connection active.
- What syncs
- Incoming and outgoing messages in real time. Even messages you send from the app appear in SendApp as a read-only copy.
- What gets imported (one-time)
- When you connect, if you choose “Share chats”, Meta imports your contacts and the last 6 months of history. Older conversations are not imported; to bulk-load more contacts use the [CSV import](/en/guide/importare-contatti-csv/).
How to set up coexistence, step by step
At step 6 of the Embedded Signup, instead of “Start with a new number”, choose “Connect your existing WhatsApp Business app”. Then follow these steps (the popup screens may appear in English, but the steps are identical):
- 1
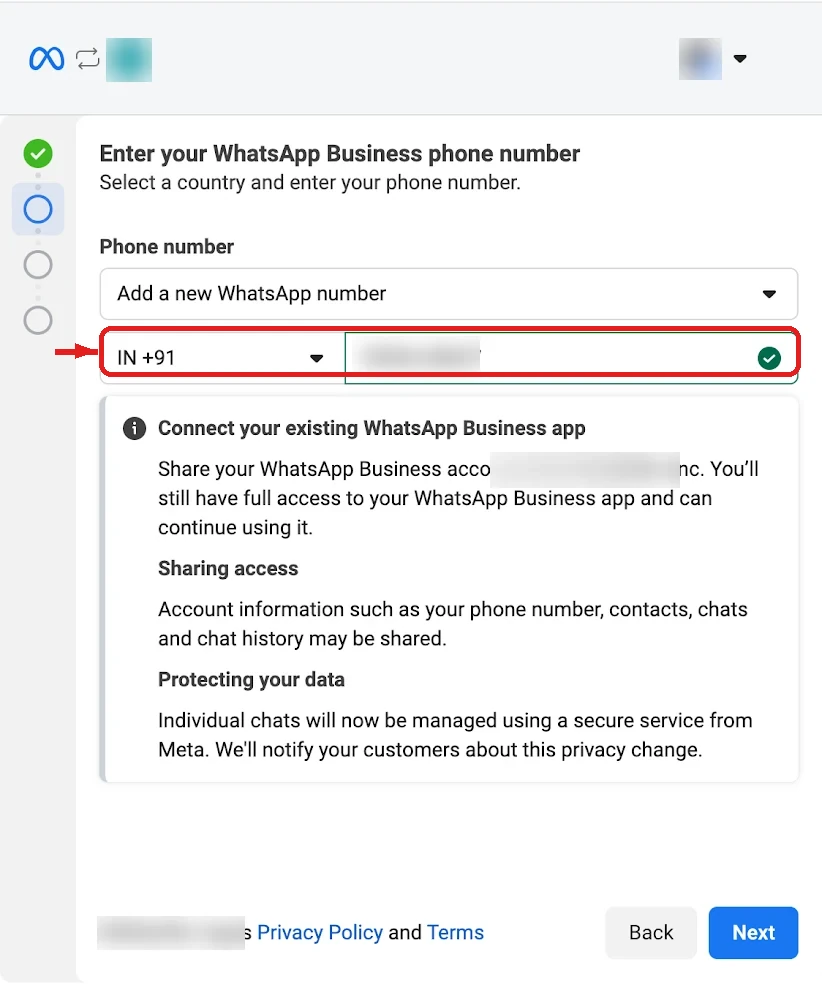
Enter the number already active on the app
Select the country and enter the number you already use in the WhatsApp Business app, then click “Next”.
- 2
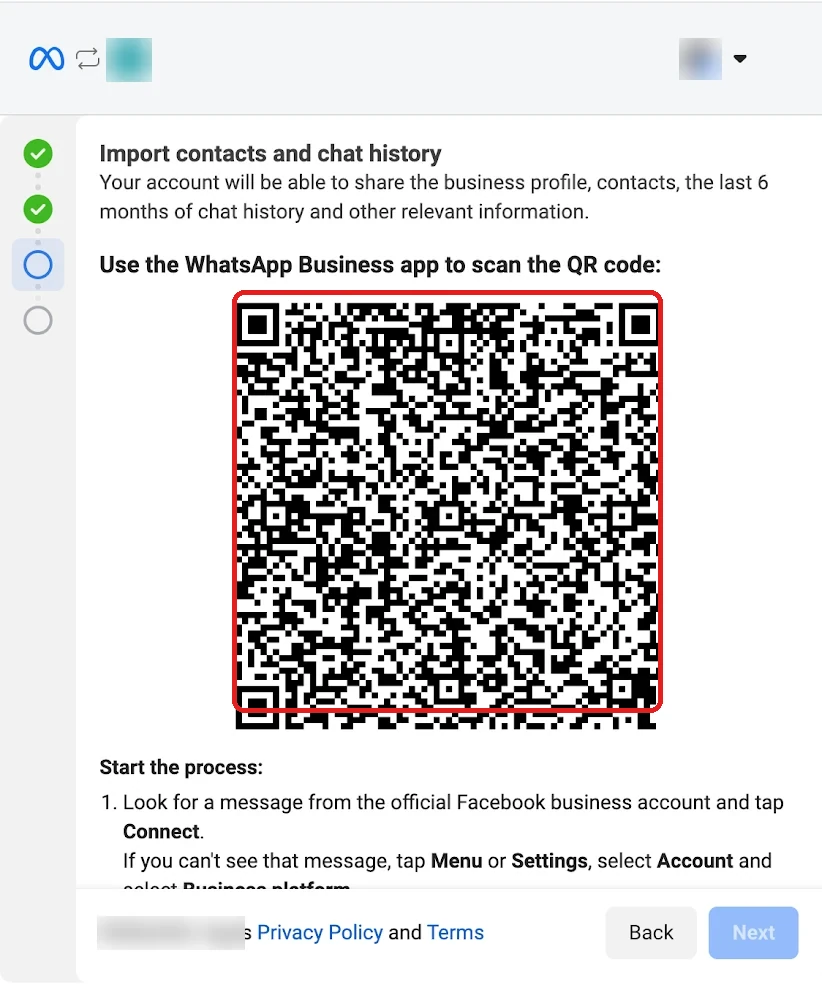
Keep the QR code open
Meta shows a QR code and warns that your profile, contacts and the last 6 months of chat history will be shared. Leave this screen open on your computer: you’ll need it in a moment.
- 3
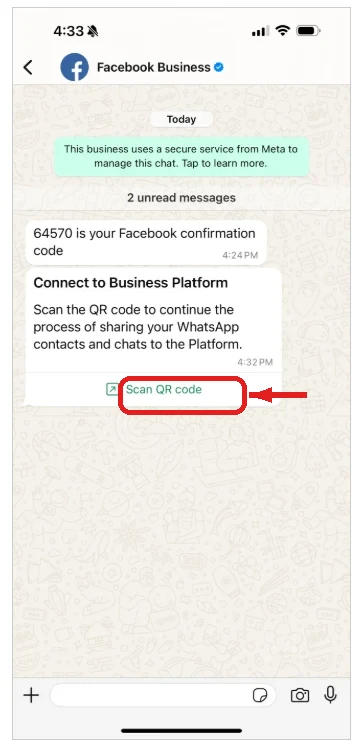
Open the Facebook Business message on your phone
On your phone, in the WhatsApp Business app, you receive a message from the official “Facebook Business” account: open it and tap “Scan QR code”. If you don’t see it, go to Settings → Account → Business platform.
- 4
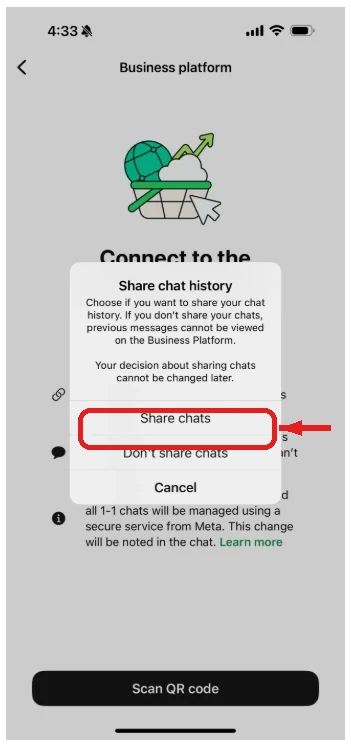
Choose whether to share history and scan
Choose whether to “Share chats” (imports the last 6 months of conversations) or not — this choice can’t be changed later — then point your phone at the QR shown on the computer to complete the connection.
In coexistence some actions move to SendApp: campaigns and broadcasts are sent from the platform (not from the app), and in 1:1 chats some app features stay disabled (editing and deleting messages, disappearing and view-once messages, live location). Messages you send from the app remain free and do not count against the API limits.
Adding the payment method (the card)
Connecting the number is free, but to send WhatsApp templates you need a card linked to the WhatsApp Business Account on Meta: without a payment method, templates stay “sent” but are not delivered. The card is added in Meta Business Manager, not in SendApp.
- 1
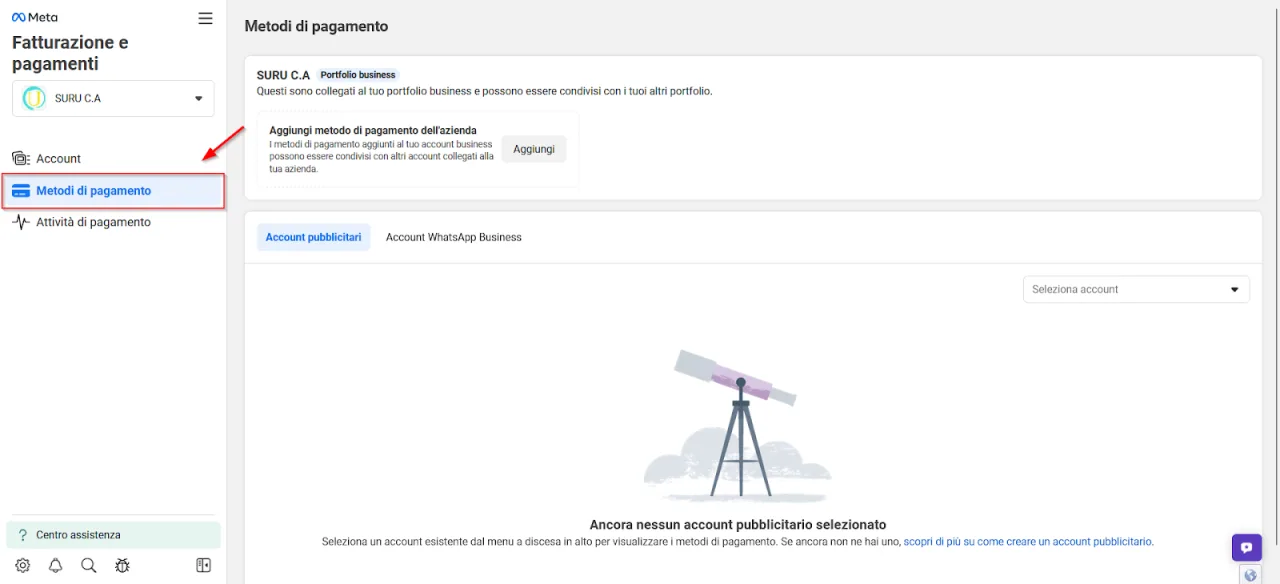
Open Payment methods in Business Manager
Go to business.facebook.com/billing_hub with the account that manages the WABA and open the “Payment methods” menu.
- 2
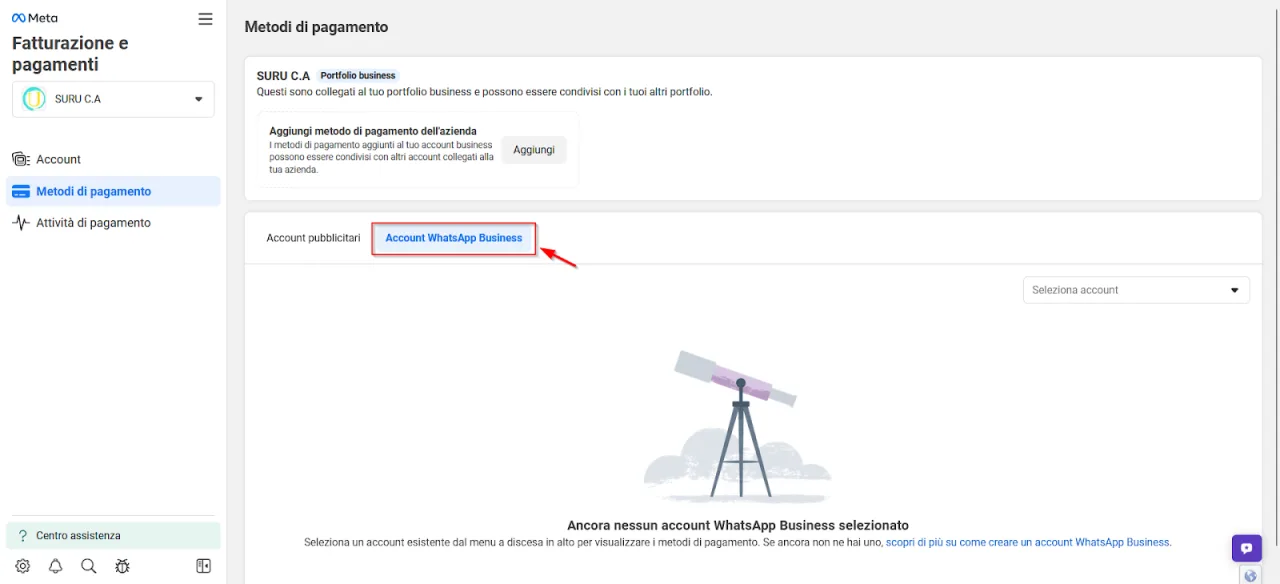
Switch to the WhatsApp Business Accounts tab
On the billing page select the “WhatsApp Business Accounts” tab.
- 3
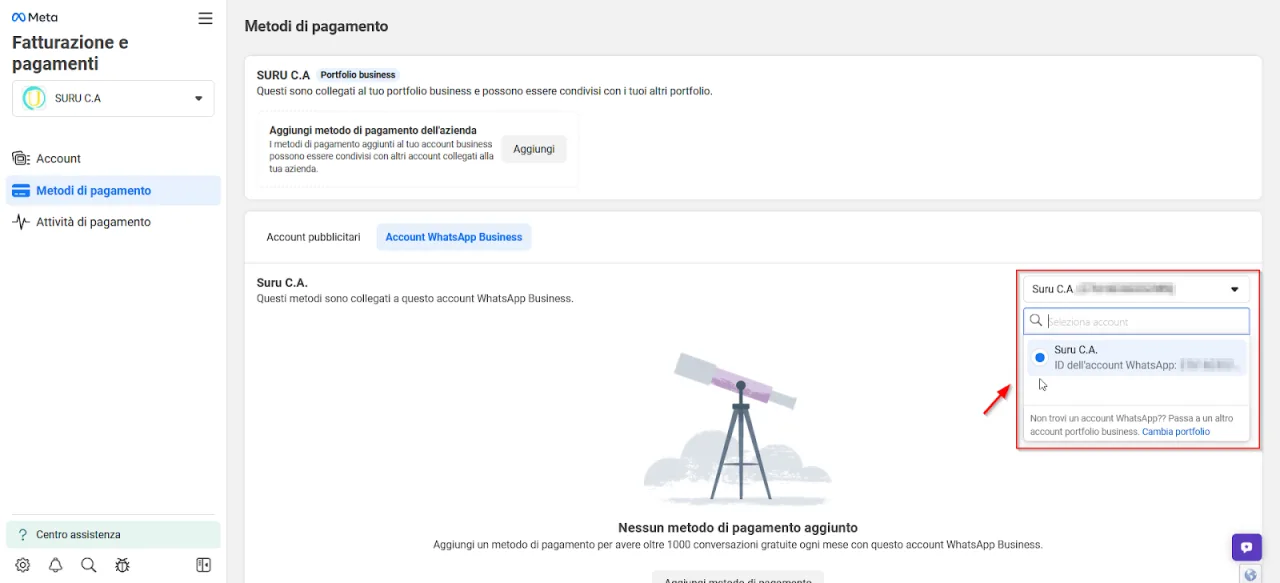
Select your WhatsApp account
Choose your WhatsApp account from the drop-down menu at the top right.
- 4
Add the payment method
Click “Add payment method”. You need Admin or Finance roles in Business Manager.

- 5
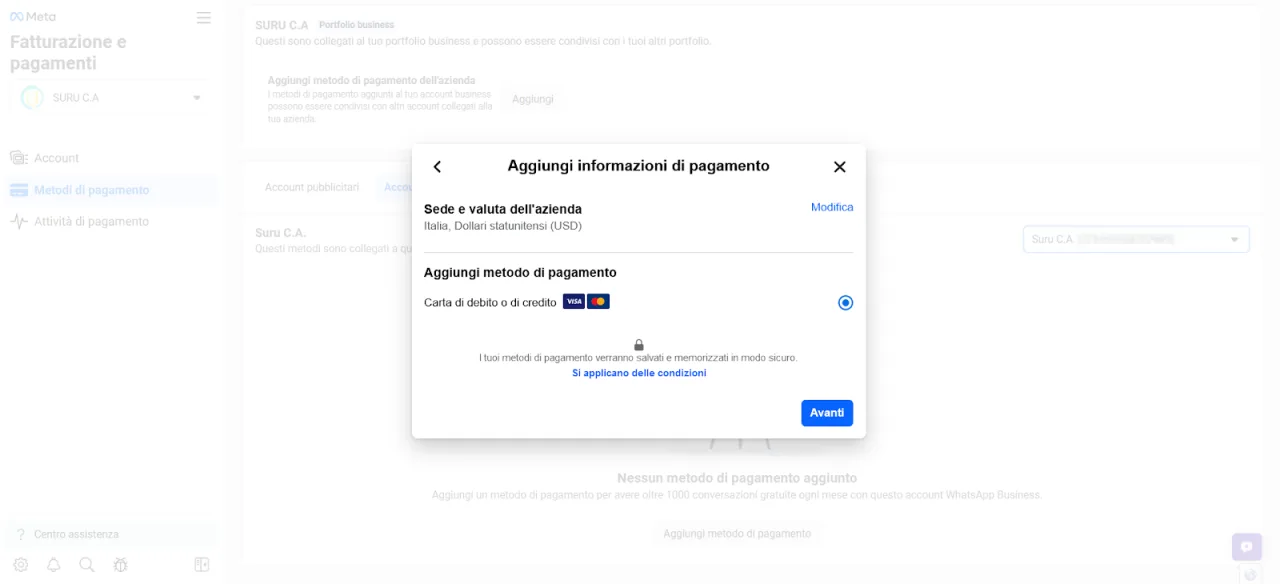
Enter the card details
Check country and currency, choose “Debit or credit card” and continue with the card details (number, expiry, CVC and name). Meta may make a small temporary verification charge, later refunded.
Use a card (Visa or Mastercard) enabled for international and online payments. Never enter the card details inside SendApp or in an email: you only enter them on the official Meta website.
Common errors and troubleshooting
- Templates aren't delivered (Meta)
- Often the payment method is missing on the number/WABA: marketing templates stay on a single check (“sent”, never “delivered”). Add a card in Meta Business Manager.
- The connection with Meta fails
- Make sure you manage the WhatsApp Business with the Meta account you're using and that the number isn't already active on another WhatsApp Business app. The Meta-side steps are explained in Meta's Help Center.
Ready to put it into practice?
Open SendApp and follow the steps in this guide. Need help? Support is one message away.