Guide/SendApp Agent/Reports & API
SendApp Pixel: connect your website and read revenue and ROI
SendApp Pixel connects your website to the messages you send. For every WhatsApp, SMS or email campaign or automation it shows who taps the button, who lands on the site, what they look at and what they buy, with revenue confirmed by orders and ROI calculated on the real cost of the messages. It is part of SendApp Agent: in this guide you connect your site and learn to read the numbers.
Updated on September 28, 2026 · 8 min read
- Click
- Visit
- Purchase
- Revenue
Before you start
- An active SendApp Agent account
- Access to your website to install a plugin or module, or to paste one line of code
- To count WhatsApp clicks: WhatsApp connected through Meta’s official API and a template with a link button
What SendApp Pixel measures
A campaign report tells you how many messages were delivered and read. Pixel follows what happens next, all the way to the purchase, and credits it to the campaign or automation that caused it. For an overview, see the SendApp Pixel page.
- Clicks
- Who taps the button in the message.
- Visits
- Who lands on the site from the message link.
- What they look at
- Pages viewed and products.
- Purchases and revenue
- What they buy, with revenue confirmed by orders.
- ROI
- Calculated on the real cost of the messages sent.
Connect your website
- 1
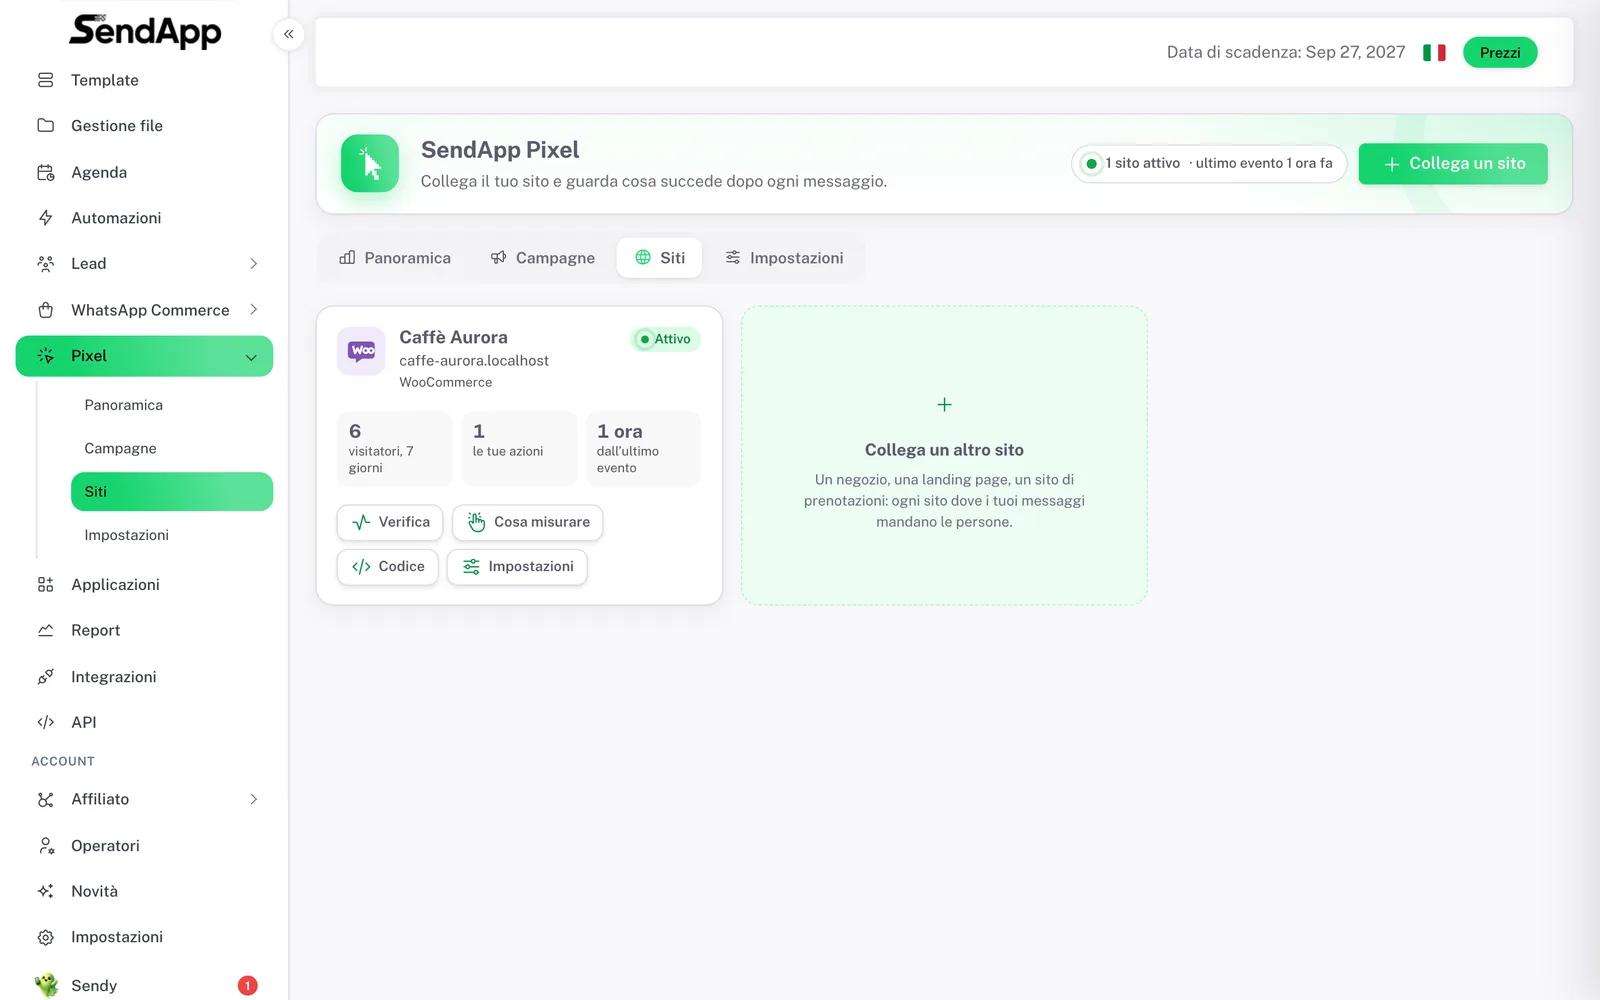
Open Pixel → Sites and press “Connect a site”
In the SendApp menu open Pixel, then the Sites tab, and press “Connect a site”.
- 2
Type the website address
SendApp reads the home page and recognizes on its own the platform, the cookie banner and any code already installed.
- 3
Choose what to measure
Page views, WhatsApp clicks, products, cart, checkout and purchases work out of the box. To also count an action of your own, such as a form submission or a button, press “Pick on site” and point to it directly on the page.
- 4
Install Pixel on your site
WordPress and WooCommerce have the SendApp Pixel plugin, PrestaShop has the module. On other sites you paste one line of code before </head>. Instructions for each platform are below.
- 5
With the plugin or module: paste the public key and secret
In the plugin or module you paste the site’s public key and secret: the connection verifies itself.
The site you connect does not have to be a store: it can be a landing page or a booking site, anywhere your messages send people.
Instructions for each platform
Each platform has a step-by-step guide on app.sendapp.ai:
- WordPress
- SendApp Pixel plugin. Instructions for WordPress
- WooCommerce
- SendApp Pixel plugin. Instructions for WooCommerce
- PrestaShop
- SendApp Pixel module. Instructions for PrestaShop
- Shopify
- One line of code before </head>. Instructions for Shopify
- Wix, Webflow, Squarespace, Framer, Google Tag Manager and any other site
- One line of code before </head>. Instructions for other sites
The full public guide is in the SendApp Pixel documentation.
Count clicks on WhatsApp templates
When you create a WhatsApp template with a link button, turn on “Count clicks”. The click goes through SendApp and is counted once per recipient, and the customer lands on the right page straight away, even before choosing in the site’s cookie banner.
Then use that template in a campaign (how to create a WhatsApp campaign) or in an automation. If your number is not connected yet, start from connecting WhatsApp with Meta’s official API.
Read campaigns, revenue and ROI
In Pixel → Campaigns every WhatsApp, SMS or email campaign has clicks, visits, purchases and revenue. With the cost of the messages, ROI is calculated automatically.
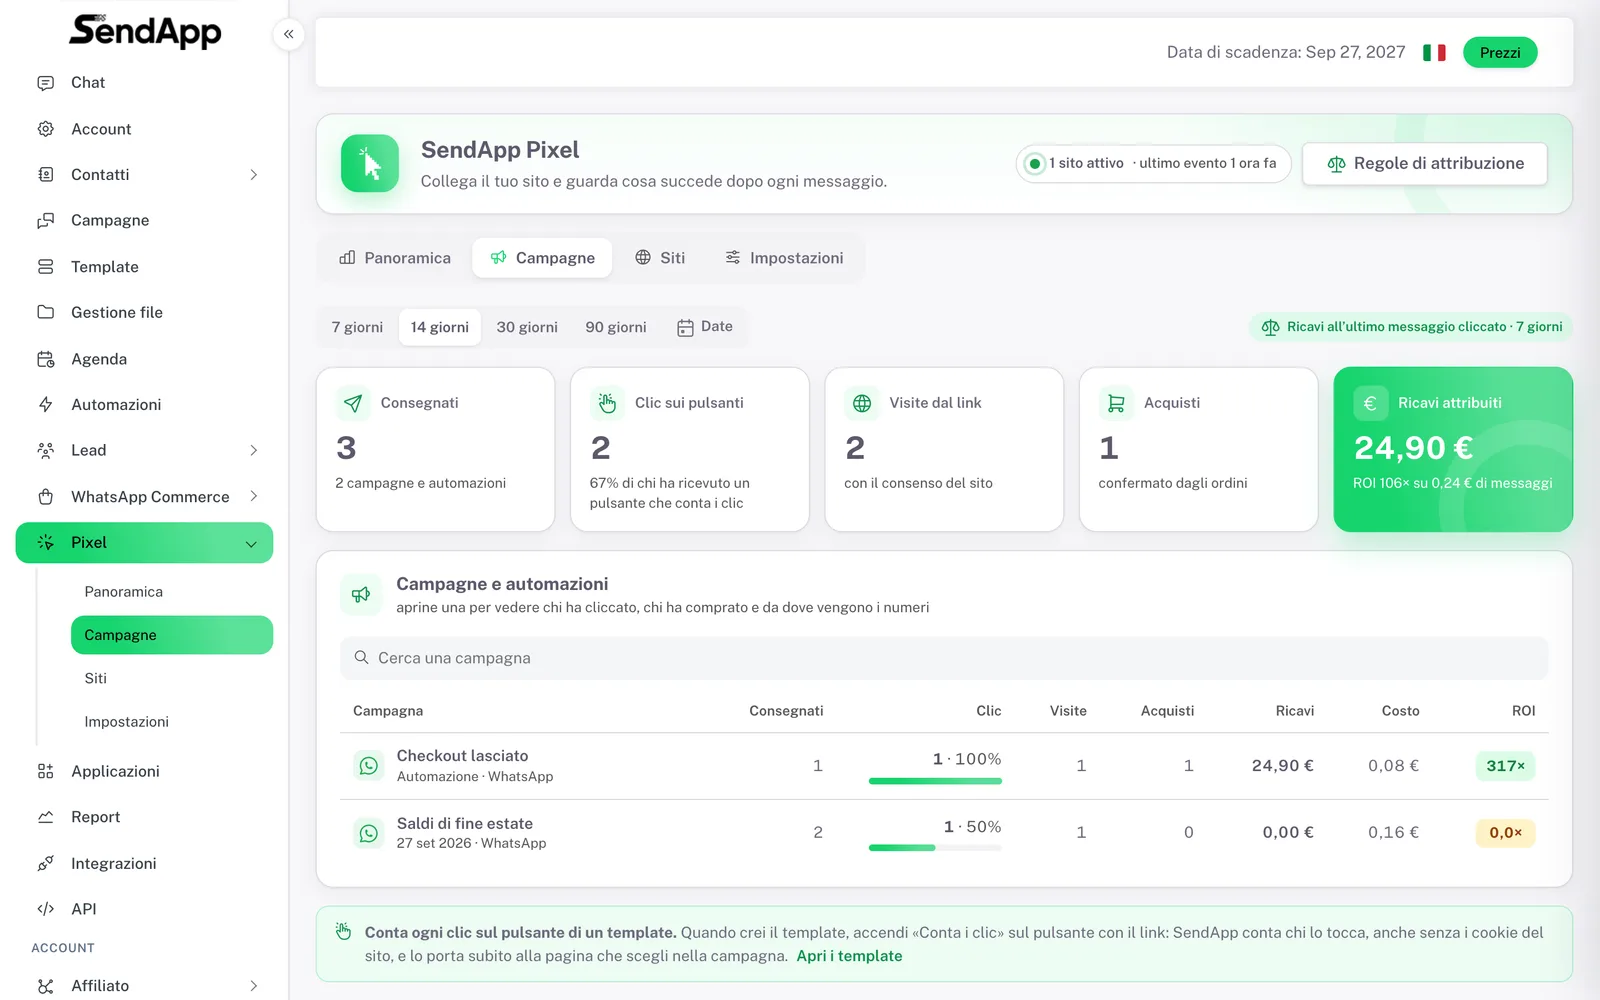
- Only confirmed orders count: a bank transfer stays “to be confirmed” until the store marks it as paid.
- Refunds are deducted from revenue.
- The cost of the messages is the real one, taken from your credit transactions, message by message.
Where the numbers come from
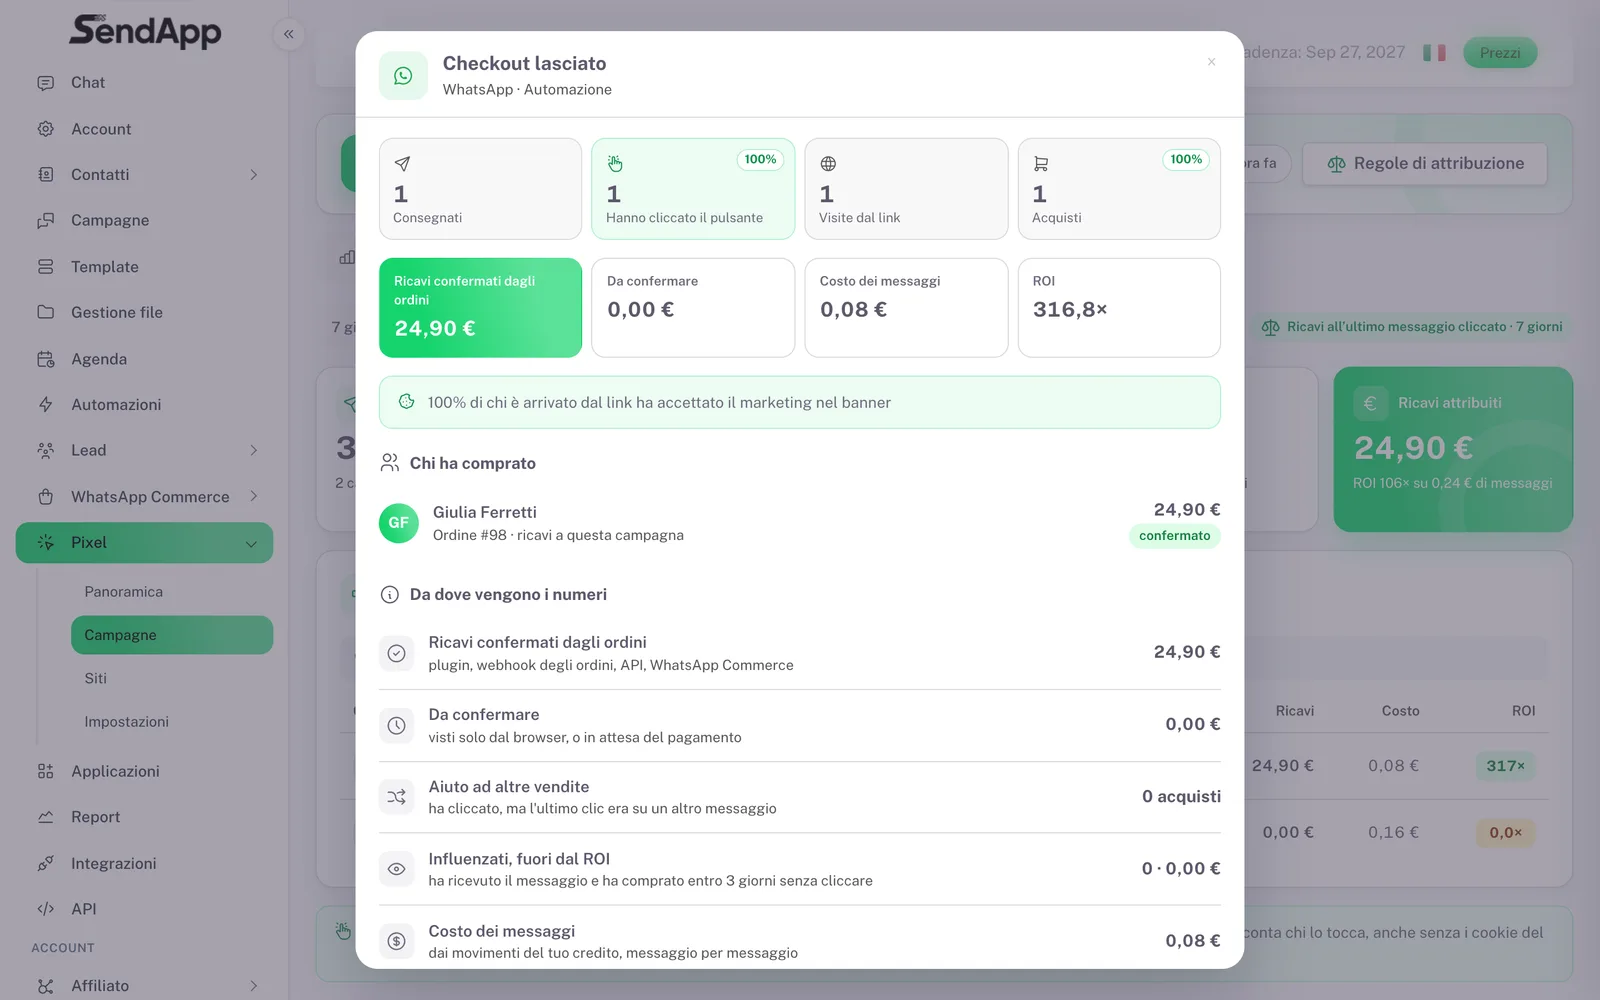
Open a campaign to see who clicked, who bought and where each figure comes from:
- Revenue confirmed by orders
- It comes from the plugin, the order webhook, the API or WhatsApp Commerce.
- To be confirmed
- Orders seen only by the browser, or awaiting payment.
- Assisted other sales
- The customer clicked, but the last click before the purchase was on another message.
- Influenced, outside ROI
- The customer received the message and bought within 3 days without clicking. You see them, but they are not part of ROI.
- Cost of messages
- From your credit transactions, message by message.
Automations triggered by the website
With the site connected, an automation can start when a contact:
- visits a page;
- performs an action;
- submits a form;
- leaves the checkout;
- buys;
- comes back to the site;
- shows high interest.
The ready-made example “Checkout abandoned on the site” sends, after a while, a WhatsApp message with a button to go back to the cart, and stops if the customer buys. How to build an automation is explained in the Automations guide.
Website automations only start for people who have given marketing consent and only for a visitor recognized with certainty: through the link in a message, the WhatsApp code, a signed login or an order confirmed by the store.
Customer profile, segments and Sendy
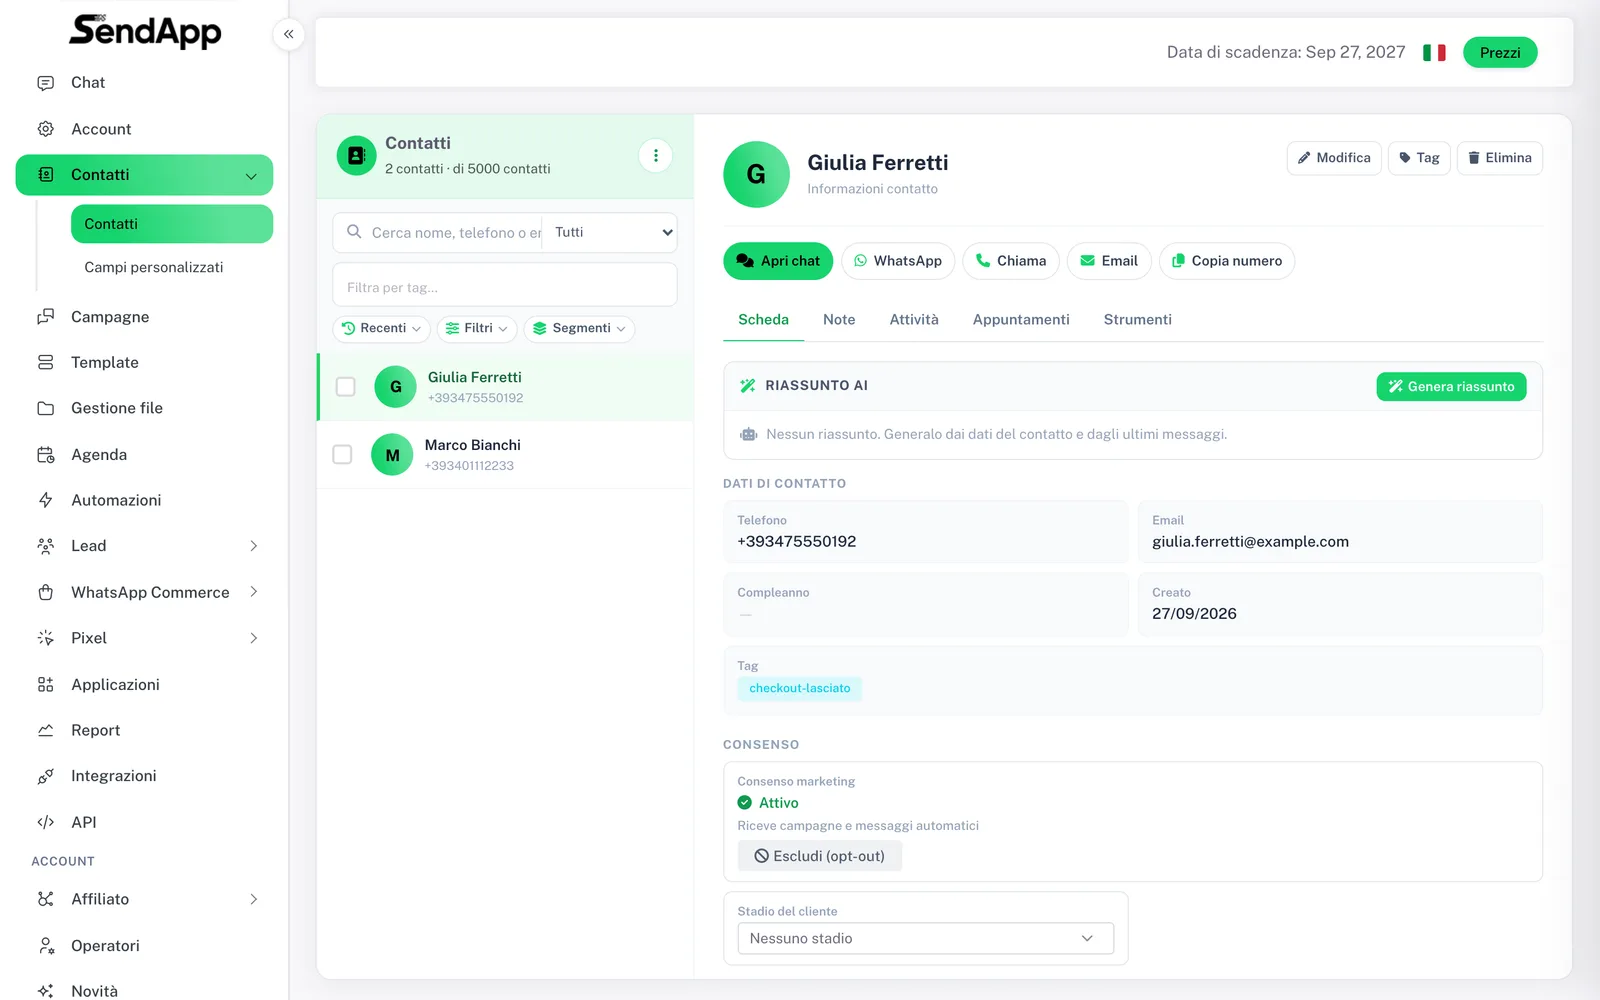
- Customer profile
- Visits, how much they spent, last order, last campaign clicked and consent given. The activity feed shows the whole journey, including the link opened.
- Segments
- You can use last visit, visits in the last 30 days and interest level.
- Sendy
- The AI assistant inside SendApp answers questions such as “who is ready to buy?” and “how much did the campaigns earn?”.
Sales outside the website
If you use a management system, you can also send Pixel server events through the API: for example in-store sales or phone orders.
Ready to put it into practice?
Open SendApp and follow the steps in this guide. Need help? Support is one message away.